Photoshop Dehaze Feature
At the risk of sounding a little behind the times, I have fairly recently discovered the “dehaze” feature in Adobe Camera Raw for Photoshop! A quick google search reveals it was announced around a year ago (eg this article on PetaPixel), but it obviously escaped my attention at the time… For anyone else who may have not noticed, the feature works a bit like a polarising filter in that it really enhances contrast and vibrance/saturation in a really nice way. Over saturating images is by far the easiest (and worst!) mistake you can make when post processing, but this slider in both Photoshop and Lightroom is very natural.

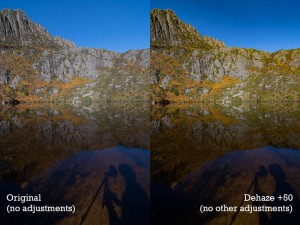
Photoshop Dehaze Feature – in this case the original file is presented on the left and on the right, the same image with a dehaze value of +50. As you can see contrast and colour are nicely enhanced. I wouldn’t always go as high as +50 but it is useful for a quick online demonstration such as this.
The dehaze feature is located in the Effects (“fx”) tab of Adobe Camera Raw and is the slider at the very top. All you need to do is drag to the left (ie select a negative value) to add haze and slide to the right (ie select a positive value) to remove haze with the side benefit of a very natural enhancement of colour and saturation.

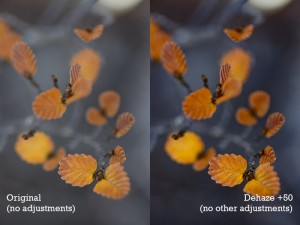
Again, the difference is striking and in no way overdone. You could even convince me that no more post processing was required at this point!
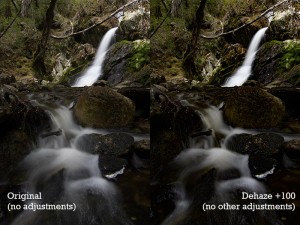
On the macro shots above there is a great effect and I could even be convinced that there would be no need to do too much more! Below I have slid the dehaze slider right to the maximum of +100 to demonstrate that even at maximum value the image doesn’t look completely over processed. The saturation is fine although the contrast is too much, particularly in the shadows. Personally I wouldn’t be sliding all the way to +100 too often so use it as much as you see fit depending on the image.

This time I have ramped up the dehaze to its maximum value of +100. This is just to emphasise the feature, and not necessarily a recommendation! It wont be necessary to use it at +100 too often but you can really see the contrast kick in, without making the image completely gaudy and over-cooked.
As with most things in the post processing world, it is easy to see the results just by using the sliders so experiment and find for yourself how useful this feature can be 🙂