Circular Polariser Filter in Landscape Photography
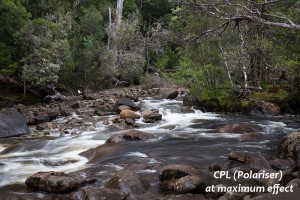
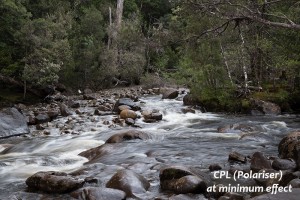
The circular polariser filter is one of the most useful filters available to landscape photographers and is surprisingly uncomplicated to use, and provides quite a dramatic effect in your images. The two shots below highlight this difference.

The polariser here is at maximum effect. Note the dark water surface, and a little more subtlely, the greenness of the leaves (particularly of the tree right in the centre of frame)
When to use a circular polariser filter (CPL)
Out of all my accessories, the CPL is the one I use the most. In fact I generally leave it attached to my lens by default, so for me the question is more about when not to use it! I don’t use it for sunrise and sunset, and of course at night. I don’t use it when a fast shutter speed is critical (eg indoors, hand held in low light etc). I would consider using it in most other situations – macro, wildlife (in bright conditions), seascapes, landscapes, forest photography.
Adjusting your CPL
The circular nature of the filter means adjustment is very simple. I find using the viewfinder (rather than live view) the best way to see the effect the polariser is having. I use live view quite a lot to assist with composition and focus, but using the view finder when adjusting the polariser is a good tip. The effect of the filter is instantly visible, so simply rotate the filters outer ring until you achieve the effect you are after.
Other points to note
* Be wary of “banding”. In particular in wide angle scenes, with lots of blue sky, there can be a noticeably dark patch in the sky where the filter is at its strongest. Used carefully the banding might add a little something to your shot, but in general it is something to be wary of. Sometimes too, the sky can be plenty blue already, and the use of a CPL can almost be too much – or maybe that’s only a concern in Tasmania where our skies are already so stunningly clear and beautiful 😉

An example of banding, top left. A clearly dark patch of blue is basically an unwanted side effect of the filter, so some caution needs to be applied when using the CPL on days of intense blue skies.
* The CPL itself is dark, so it results in a longer exposure. This is usually a desirable effect (eg when shooting waterfalls or rushing water) but it is unhelpful when a fast shutter is required.
* Being a circular filter, you need to purchase a CPL with the same diameter as your lens. Rather than purchasing a CPL for all your lenses, you might like to look at “step up rings”, a cheap alternative which allows a large diameter filter (say 82mm) to be used on another lens with a smaller diameter (say 77mm). As usual, google is your friend, and these accessories should be available at most camera shops.
The CPL is a filter I recommend for everyone getting into landscape photography, and in particular anyone who is joining me on one of my trips. I hope these notes might serve as a useful introduction to the CPL and I look forward to showing you the ins and outs when we head out in the field together!
